shUnit2とCircleCIでシェルスクリプトの単体テストをしてみた
シェルスクリプトでも単体テストを書いてCIした方が精神衛生上好ましいなと思い、
調べてみるとshUnit2という単体テストフレームワークがあったので、
これを使って単体テストとCIを実施してみました。
shUnit2
https://code.google.com/archive/p/shunit2/
CircleCI
https://circleci.com/
全体の流れは、以下の通りです。
- shUnit2のセットアップ
- シェルスクリプトのプロジェクト作成
- CircleCIの設定
この手順はMacOSXで実施しましたが、
bashが動く環境であれば同様の手順で実行できると思われます。
このエントリで作成したgithubリポジトリ:
https://github.com/takemikami/shunit-sample
shUnit2のセットアップ
セットアップ
まずは、shUnit2をセットアップします。
ダウンロードし、そのパスを環境変数「SHUNIT2_HOME」に設定するだけです。
以下のように、ダウンロード及び展開します。
$ cd ~/
$ wget https://storage.googleapis.com/google-code-archive-downloads/v2/code.google.com/shunit2/shunit2-2.1.6.tgz
$ mkdir ~/.shunit2
$ tar zxf shunit2-2.1.6.tgz -C ~/.shunit2
$ rm shunit2-2.1.6.tgz
以下のように、環境変数を設定します。
$ echo 'export SHUNIT2_HOME=$HOME/.shunit2/shunit2-2.1.6' >> ~/.bash_profile
$ . ~/.bash_profile
サンプルの実行
以下のように、
shUnit2のexamplesディレクトリから、作業ディレクトリにサンプルをコピーします。
$ cp $SHUNIT2_HOME/examples/equality_test.sh ./equality_test.sh
セットアップの手続きで設定した環境変数を使って、
shUnit2を実行するように、equality_test.shの最後の一行を変更します。
#! /bin/sh
# file: examples/equality_test.sh

testEquality()
{
  assertEquals 1 1
}

# load shunit2
. $SHUNIT2_HOME/src/shunit2
以下のようにテストを実行します。
$ bash equality_test.sh
testEquality

Ran 1 test.

OK
テストの書き方は、次のドキュメントを参照します(基本的にJUnitと同じですが)。
shUnit2 2.1.x ドキュメント
https://sites.google.com/site/paclearner/shunit2-documentation
bashスクリプトのプロジェクト作成
gitリポジトリの作成
$ mkdir ~/shunit-sample && cd $_
$ git init
$ mkdir sh
$ mkdir -p test/sh
シェルスクリプトとテストコードの作成
以下のとおり、テスト対象のシェルスクリプトを作ります。
sh/sample.sh
#!/bin/bash

job1() {
  echo "job1 exec"
  return 1
}
job2() {
  echo "job2 exec"
  return 2
}

if [ $0 = $BASH_SOURCE ]; then
  job1
  job2
fi
# if [ $0 = $BASH_SOURCE ]; の箇所で、
# 直接シェルを実行した時のみメイン処理を実行するようにしています
#(インクルード時には実行しない)
以下のとおり、テストコードを作ります。
test/sh/test_sample.sh
. $(dirname $BASH_SOURCE)/../../sh/sample.sh

testJob1()
{
  job1
  assertEquals 1 $?
}

testJob2()
{
  job2
  assertEquals 2 $?
}

# load shunit2
. $SHUNIT2_HOME/src/shunit2
以下のように、テストを実行します。
$ bash test/sh/test_sample.sh
testJob1
job1 exec
testJob2
job2 exec

Ran 2 tests.

OK
ちなみに、単純にサンプルのシェルスクリプトを実行すると以下のようになります。
$ bash sh/sample.sh
job1 exec
job2 exec
githubにpush
コードをコミットし、githubにpushします。
$ git add .
$ git commit -a -m "initial commit"
$ git remote add origin git@github.com:※githubのリポジトリ※
$ git push -u origin master
CircleCIの設定
CircleCIにProjectを追加
CircleCI
https://circleci.com/
CircleCIにgithubのアカウントでログインし、
「ADD PROJECT」メニューから
先程pushしたリポジトリの「BuildProject」を追加します。
この状態だと「NO TESTS」と怒られます。
circle.ymlの追加
以下の通りcircle.ymlを作ります。
circle.yml
machine:
  environment:
    SHUNIT2_HOME: ${HOME}/.shunit2/shunit2-2.1.6

dependencies:
  pre:
    - "[ ! -e ~/.shunit2 ] && wget https://storage.googleapis.com/google-code-archive-downloads/v2/code.google.com/shunit2/shunit2-2.1.6.tgz && mkdir ~/.shunit2 && tar zxf shunit2-2.1.6.tgz -C ~/.shunit2 || echo 'ready'"
  cache_directories:
    - "~/.shunit2"

test:
  override:
    - bash test/sh/test_sample.sh
circle.ymlを追加し、githubにpushします。
$ git add circle.yml
$ git commit -a -m "add circle yaml"
$ git push
pushすると、CircleCI上でテストが実行され、
以下のように、単体テストが成功しているはずです。
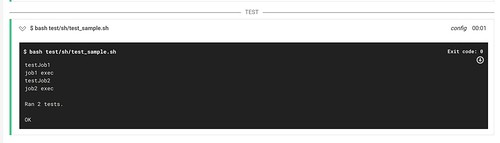
これで精神衛生上好ましい感じに出来そうですね。